7.30.2011

Giveaway time

My small way of saying thank you for all of the inspiration I get from all of you.

While out shopping yesterday, I found a burlap tote that is big enough to actually carry groceries in, and as an added bonus it’s lined/backed in plastic so any messes will be easy to clean.

By itself it’s pretty plain, so I decided to gussy it up a bit, just for you. I used freezer paper to cut out this Paris Flower Market sign and stencilled it on to the bag. Think abut how chic you will look, carrying your groceries home in this :)

 MARKET TOTE 2

MARKET TOTE

Wait, there’s more!  I will also include a set of vinyl, pre-weeded and ready to apply so you can make your own Rustic Herb Crates. I’d send the crates too, but the shipping would break me :)

all three 2

How can you win?  Easy. Become a follower via Google Friend Connect then leave a comment letting me know. If you are already a follower, let me know.

Please include your email address in your comment if you don’t have your email attached to your account. Type it out as words to avoid getting spam. like this, flyingfishlips at gmail dot com

This giveaway is for residents of  Canada and the U.S. only. Giveaway will end on Friday, August 5th at 6:00 am and I'll announce the winner that day. Thanks and good luck!

I won a giveaway

Sarah at The Birds Papaya (a fellow Canadian) hosted a giveaway and I won!

Marilyn at BeiFiori on Etsy has a lovely shop filled with handmade and charming gifts. Her prices are amazing and her work is impeccable.

I had $25 to spend and it wasn’t easy to decided on what to get, as there are so many lovely things. I decided on a French postage stamp tote and a couple of gift bags.

DSCN2129Adorable huh?

DSCN2133Thank you to Sarah and to Marilyn for my gifts, I will cherish them. 

7.27.2011

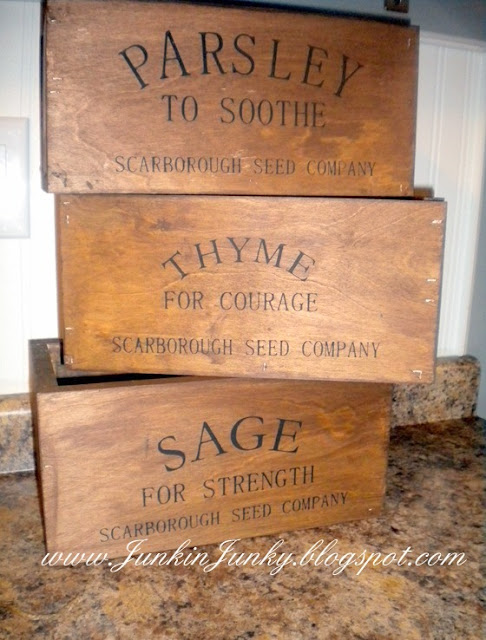
Rustic herb crates knock off

You’ve seen them everywhere, most notably at The Lettered Cottage. They are not that expensive to purchase, but when you factor in the shipping costs to Canada, they make it a big splurge.

So what’s a poor girl to do? Make them. This project didn’t cost me anything, as I had all of the supplies at home.

Here’s mine

DIY rustic herb crates at www.junkinjunky.blogspot.com

I only had enough wood to make three and since my wood was already cut for sign making, I used it.
The total outside measurements are 12” width x 6” height x 7 depth.  I’ve never made a box before in my life, so it was a bit of trial and error, and since I have no clamps, they are not square, but who’s looking that close?

Here’s the steps I took for the lettering.

After making the boxes, I stained them with American walnut, the only stain I have.

I cut out the letters in vinyl and reverse weeded them.

Rustic herb crates DIY at JunkinJunky.blogspot.com

Using transfer tape, I covered the vinyl completely, then removed the vinyl from the paper backing.

Rustic herb crates DIY at JunkinJunky.blogspot.com

Rub the vinyl on to the wood really well, then remove the transfer tape.

Paint over the areas where the letters are

Rustic herb crates DIY at JunkinJunky.blogspot.com

Remove the vinyl while your paint is still slightly damp, it makes it easier to remove.

Now I have to come up with some way to get the hooks. I’ll ask around at work tomorrow for some ideas,
and if you have any to share, I’d love to hear them.

Rustic herb crates DIY at JunkinJunky.blogspot.com

Here are the original crates that inspired me.
kratjeskruiden3 Sharing at
Somewhat SimpleThe Shabby Creek Cottage{Primp}The DIY Show Off
Funky Junk's Saturday Nite Special

7.26.2011

Organizing a lingerie chest

When I made over my $20 lingerie chest, I didn’t know at the time how to keep track of what was in each drawer.

001

For more than a year now, I have had to open each drawer to figure out which one holds my socks, which one holds my underwear, etc. etc.  I could never remember and I certainly wasn’t going to label them LOL

As I was about to do my search once again this morning, it finally dawned on me…ORGANIZE it from the top of your body to the bottom of your body.  I put my bras on top, undies next and socks below that.  Makes total sense. The other drawers are for those items that are used less often.

Am I the only one that didn’t know this already?

7.24.2011

Butterfly specimen art

This has been done before, so nothing new here, but I still really like the graphic element of it.
I did my first one back in February of 2010 and it is now in my bedroom.
DSCN2106
I removed the raindrops from this frame and added butterflies, in a gradient.
DSCN2118
I started with black and worked my way up in varying shades of blue.
And now it’s on my wall that I love to play around with. I’ve also added my vintage sail boat lamp inside of a vintage crate, and another set of deer horns that a co-worker gave me.
DSCN2123
DSCN2126
I have stained my new to me coffee table and it’s ok. It’s not perfect, but I’ll live with it. I hope to have it done before next weekend, but it’s been so hot here that I avoid going outside. Serious, it was 47 with the humidex on Thursday (116 F.)

Sharing at

linkingpartybadge copyMaking Monday Marvelous Linky PartyUndertheTableandDreaming

7.20.2011

What’s up with Pinterest?

I love Pinterest, in fact it’s safe to say that I may be a little addicted. So, when I continually encounter this message

Pinterest I start getting the heebie jeebies :)

Looks like they can’t keep up with the popularity. I hope they get this fixed soon. Please :)

7.19.2011

Help – how much do I have to sand

I stopped at the thrift store after work and found this substantial coffee table.

 ct2 ct1

It’s a heavy beast :)  And the best part…

price

It has some dings, scratches and nicks, but they are surface only and I knew I could sand them out.

My plan is to stain the top in Minwax American Walnut and paint the bottom portion in a creamy white.  I really need some natural wood in my living room, all of my furniture is painted.

What I really like is that it has tons of space for storage underneath.

I have sanded it down, but I’m not sure when I know it’s been sanded enough.  Can someone give me some tips?

Here it is now.

sandedI want to be sure that it’s going to accept the new stain. Help? anyone! The dark spot on the bottom left is water, not varnish. 

7.17.2011

DIY savings bank


while trolling on Pinterest, I saw this Dream Bank at Uncommon Goods and immediately scrounged through my stash to find a shadow box.

By the time school starts in September, my daughter hopes to have saved enough to buy herself a laptop.
I had this shadow box that I picked up a while ago for a few bucks.

003
I unscrewed the teeny tiny screws at the back with a screwdriver used for eyeglasses. Drilled a slit across the top to insert the money and used some pretty scrapbook paper to line it.

It won’t be easy for her to get her money out, which will hopefully encourage her to continue saving.

009

005

I’m going to keep my eye out for more of these. They will make a great gift for any one, whatever their dream is.


CSS Logo post small

7.16.2011

DIY clock

I needed a clock for my living room. I decided I should make one. I bought the mechanism, bought a plate, drilled a hole, cut out my vinyl, put it all together.

001 003


006-1